WordPress Plugins – Editorial Calendar

editorialcalendar1

I deeply love the Editorial Calendar plugin. DEEPLY LOVE IT. This thing is Magic with a capital M, and here are my reasons why.

Date Drafts –

With the Editorial Calendar, you can quickly and easily create drafts for specific dates. On a Sunday in November, I went through and created all my Sunday Selections posts for 2016. It took me less than 20 minutes to create 52 drafts. Here is how you create a post for a specific date, it is super simple.

editnewpost

Find the date you want on the calendar. Click on New Post which is in blue at the top.

editnewpost1

This will give you a small pop-up box – this is where you put in the title and the time you want the post to go live. You can actually add your content in here if you like – I prefer the full editing window, however if there is a thought in my mind which I don’t want to lose, I will often put it in here when I create the post.

schedule

This one click New Post step skips over scheduling a post for a certain date, which is quite a lot of options you have to set to get it right, especially when you start writing posts for 2016. If you mess up, you’ll schedule your post for 2015, which means it will post right away. That is Not Optimal. :)

The Way I Write

It is pretty rare for me to arrive at the computer, start a new post, and then write it and add photos all in one sitting. When I have an idea for a post, I will go into the calendar, find the next available posting date then click on New Post, put in a title and set it for a 5am publish. That is usually my first step and much of the time that is where it will end.

calendaredit

When I am ready to start writing the actual post, I will go back into the calendar and right click on edit and open the edit page in a new tab. That is when I will add categories and start putting in the text of the post. If I have photos ready I will put them in first and then add the text around them. If the post does not have photos to go with it, I will put one of my flower pics saved aside in a special folder.

Most of my posts are written across several sittings – this post was started on November 24th, the meat of it was written November 27th, there were further additions on Nov X and X, and the post was given the final polish on Dec X.

One Glance –

edit1

I love that you can see everything with just one glance – whether a post is a draft or not, what you have scheduled on which days.. My posts remain as drafts until they are completed and ready to post, so on any given day I can open the calendar and see what posts I need to work on.

Regular Posts –

You’ll have noticed a bit of a pattern if you have been reading here long enough. I have certain posts which I schedule for certain times. Snoskred Snacks was posted fortnighly on a Friday for a couple of months. Sunday Selections is every Sunday. On the last day of each month I post the New Feeds post.

If you know these posts are going to be weekly or monthly, you can go into the calendar and put in a draft for those dates.

The Default Time –

calwrongtime

I like my posts to go live at 5am – with the calendar I can easily scroll through and make sure things are set for the right time. Posts set for 10am by default if you don’t change the time via the dropdown.

Manual Options –

So, if you are using wordpress.com or blogspot, what options do you have when it comes to blog planning? Mostly it will be paper based, though you could use Google Calendar or other online calendar options. If you want a printable monthly blog calendar, Natasha from The Artisan Life created this one – you can search for other versions.

blogging tips, wordpress

No More Partial Feeds

flower3

I’m OVER partial feeds. If I add a feed into my feed reader only to discover it is a partial feed, I am unsubscribing right away and the blog will not appear in the monthly new feeds list. No matter how much I might have wanted to read that blog or enjoyed the content I saw there!

If a blogger is going to make me click through to their blog for every post in full, I’m out. Even if they are an amazing writer. Even if I really love what I saw on their blog.

Consider This –

Do bloggers really want to make their readers jump through hoops to read their content? I’m not a performing dog. :) Ain’t nobody got time for that shiznit! If I like the post and I have the time, I’m going to click through and comment.

If a blogger gives me a tiny snippet of their post and what is there does not seem interesting, I’m not clicking through. Sorry. :( A partial feed is simply a terrible concept when bloggers want people to read their writing. Those bloggers are frustrating your readers, and that content they worked so hard on is likely going to be left unread.

Current Reads –

For partial feeds already in the feed reader, I went through my feeds during October. I unsubscribed from all partial feed blogs and removed them from the blogroll. There are only two exceptions to this –

– I really, truly, deeply love your content and I want to keep reading your blog – but please, reconsider your partial feed!

– You comment here on a regular basis and/or I comment at yours regularly.

I also unsubscribed from blogs that had stopped posting, and blogs that use too many large photos as they take a long time to download, and can be very irritating. If you do not know how to resize your images, find out! Here is a post from Sephy that will help you.

Content Scraping –

If the reason you are using a partial feed is because you are worried about content scraping, there are things you can do that do not involve a partial feed – like these –

7 Tips and Tools to Stop Content Thieves in their Tracks

Beginner’s Guide to Preventing Blog Content Scraping in WordPress

But Wait, I’m Not Sure –

Do you know what kind of feed you are providing to your readers? If you do not, you had best subscribe to your own blog and find out. You should always subscribe to your own blog so you can make sure your content is appearing exactly how you want it to appear.

A partial feed is part of a post – eg, the first 20-50 characters and sometimes a photo as well. I do have blogs where all I get is the title of a post, sometimes the title and a photo and no text. None of those things are remotely tempting me to click through. In fact, what they are doing is making me feel annoyed and frustrated.

In Conclusion –

There are a lot of blogs out there in the world. I’d like to read all of them however there are not enough hours in the day. Presently I am reading over 600 blogs, which is a LOT of blogs, and the frustration I feel when I see a partial feed post simply is not fun or enjoyable for me.

It is mostly me, but bloggers who are using a partial feed, it is partly you too. If you are a blogger who only cares about blog stats and people clicking through to your blog, feel free to keep using partial feeds. I won’t be reading your blog, though. :/

Over To You –

What are your thoughts on partial feeds?

If you were using a partial feed but have gone back to full, let me know as I may have already unsubscribed.

blogging tips, New Feeds

How To – Create Free Link Ups Via SimplyLinked

flower

I often see bloggers inviting other bloggers to participate in a blog award, or a weekly challenge, or even just asking other bloggers to provide links to blogs that they enjoy reading.

These days probably 75% of the time, it seems that bloggers are not using any of the link up tools that are available out there on the interwebs. I often think the major reason for not using these tools is because people tend to think these tools are a lot more complicated than they actually are, that setting up an account is time consuming, that it is all Too Hard.. but as this how to guide will show you, that is not the case at all.

If I told you that within the space of 10 minutes, you could create your account *and* your first link up, would you give it a try? If I am honest, it is more likely to take around 5 minutes, given it took me 6 minutes and I was taking screenshots and editing them in between.

How To – Create Free Link Ups Via SimplyLinked

Now I’m going to show you how to use one of the completely free, easiest and simplest link up tools which can save you a lot of time and energy PLUS make it easier for people to link up to whatever it is you have going on at your blog. The tool is called Simply Linked.

link1

First up, we have to create your account. Click on Sign up for a free account.

link2

You only need to provide 6 details as seen above – your name, email address, name of your website, website url, username and password. When you’ve filled in the boxes, hit submit.

link3

And you have created your account. Easy, no? So click on the link to go back to the home page and log in.

link4

Type in the username and password you just created, and hit submit. You’ll then find yourself logged in.

link7

There is not a lot to see here, because you have not created any link ups. So let us create one. Click on Create New List.

link5

Put in your link up name, and choose standard as the option. Click on create list.

link9

You will then have created your link up and you will be provided with some javascript code to paste into your blog. Simply copy it, and then paste it into your blog post. The finished product should look a lot like this – though my blog theme seems to have taken over making the button look quite spiffy here on my blog –

link6

It really is that simple. In fact, even with me taking screenshots, I had created my account and my first link up within 6 minutes. To create a new link up while logged in is only as long as it takes you to type in the title.

link8

Once you have created a link up, you can view it via the current lists screen, just click on current lists. To view the links which have been added, click on the link up name.

link10

Once people start adding links, you can choose to edit or delete them.

linkup1

Added links will appear at the top, above the place where people can add their links.

The best thing about this tool is – everything remains within your blog. Nobody is being sent elsewhere – they add their link within the post you’ve written. Here is a test link up, so you can give it a try right here if you like, I also want to see how it goes through on my feed..

This link up tool does not give you the option to use thumbnail images at all. There are link tools available which will allow people to add thumbnail images but *all* of those tools cost money. The tool I use here – Inlinkz – is a little more complicated to create a basic link up, and Inlinkz costs me $20 a year to allow thumbnails and have some extra options, eg I can allow my link ups to remain open forever.

Simply Linked is a good, basic, free option. You do have to keep an eye on your links to make sure nobody adds any spam – this is one reason why I would suggest that you close off link ups after a certain amount of time has passed. I am assuming they will add other options which people will have to pay for, eventually. Simply Linked is an excellent option for people wanting fast and easy to create link ups.

I will show you around – and how to use – Inlinkz in a future how to guide. I probably should also mention, in case anyone was wondering.. none of these companies are paying me to write about their link up tools, by the way. :)

Will You Use This Tool?

Over to you – let me know, do you think this is a tool you could use on your blog?

blogging tips, how to guides

5 Lessons I Learned From Looking Back

img_6123

Recently I went back through all the posts I’d written here on the blog. While looking back I learned some lessons which might be useful to other people, so I thought I would share them with you. :)

5. About Categories –

I wrote a little about this in an earlier post – Sephyroth Is A Genius – I think the most important lesson I learned was to come up with a decent plan for categories and then stick to it.

4. About Better Post Titles –

Before I learned anything about blogging, my post titles were in general pretty terrible. Sometimes they did not relate in any way to the text of the post. Here are a few examples of crappy titles I once used – Quick BlogYeah I knowEek!W00t!

How To Fix This –

Write better titles. Read some articles about writing better titles. In general my titles now tend to give people an idea of what the post itself is about, but I still think I could do better. :)

3. About Posting Images –

Sometimes images that I had posted were no longer available. Many of these were my *own* images which Blogger had deleted as a surprise to me. They actually do that fairly regularly. I did not delete any Picasa albums, so I have no idea why my images vanished, and I can’t be bothered trying to figure it out. If a post relied heavily on pictures that were now missing, I had to make the difficult decision to delete those posts and move on.

Also, with some images I had done a bit of a bad thing – back in the days before I knew better – I had “hot linked” to images on other sites. I had no idea that was not the done thing. I know better now. :)

How To Fix This –

Now I keep all my blog images on my own blog, plus I put them into a folder called “posted” when I have posted them, so I could easily find them again if I needed to. Plus, Absolutely No Hotlinking – eg posting an image that resides on another site here on my site.

2. About Posting Links –

Blogs disappear. They move without leaving a forwarding address. News articles disappear, too. I had based several blog posts on a post from another blogger or a news article without including enough information – and when the post or news article disappeared, my post no longer made any sense. Those posts had to be deleted.

Take this post – I want to work here – as an example. If the post I had linked to no longer existed, how much sense would that post make? Zero.

How To Fix This –

When I write posts in the future, I need to make sure my posts can stand alone – if I am linking to another post or a news article, it might be an idea to take a screenshot of the article and include that in the post or save a copy of the article somewhere, in case the original disappears. Links should play a supporting role, not be the star of a post I write.

1. About Posting Videos –

I had to delete about 40 posts where I had posted just a title and a youtube video. In almost all of these cases, the title was something like “I Love This Video” or “This Video Is Awesome” and nowhere in the post did I happen to mention the NAME of the video or the artist. When I went to play the video, I got the youtube message “This video has been removed due to X, Y or Z reason”.

Without a name or an artist or any idea what video I might have posted, it was impossible to fix these posts to resemble the original post. They had to be deleted.

How To Fix This –

Going forward, I will always make sure to include the video name and artist when posting videos.

blog housekeeping, blogging tips

How To – Add A WordPress.com Follow Button To Self Hosted WordPress.

steps

Why yes, that is a super long title but I have posted it in the hope that it will end up on the very first page of multiple search engines because I searched for a how-to do this for several hours the other day with zero luck..

Giving up on searching via Dogpile, Google, etc, I then searched wordpress.org support and also the support forum for the Jetpack plugin. I could find plenty of people asking how to do this, and zero answers. I ended up having to lodge a support ticket and I got an answer back which helped me work it out.

A lot of people when they receive the answer seem to keep it to themselves – not updating their support threads with the answer – which is probably why I could not find it, no matter how hard I searched. So here is the answer for anyone looking for it!

Important note – for this to work, you need to have the Jetpack plugin enabled on your self hosted wordpress blog.

step1

1. Go to Jetpack –> Settings.

step2

2. Activate JSON API within Jetpack – also take note, you will need to leave this activated for the button to continue to work.

step3

3. Visit the Follow Button Creation page.

step4

4. Scroll down to the area where you can enter in your blog URL. Enter it, then decide if you want to show how many followers you have, and whether you want to show your blog name. If you have a long blog name like mine, the button will be super long! Then, hit generate.

step5

5. Copy the code which has been generated.

step6

6. Go into your add widget area within appearance.

final

7. Paste the code into a text widget on your self-hosted wordpress blog. Hit save, and you are done!

Happy moments! :) And Whew, thank the deities that is over.

But I’m on wordpress.com?

Well then, this is super easy. :)

wp1

1. In Appearance –> Widgets – scroll down the page until you see Follow Button.

wp2

2. Drag and drop the follow button over to your sidebar.

wp3

3. Click on the little drop down arrow to see the options, adjust your options to suit and then click on save.

Done!

blogging tips, how to guides, wordpress, Wordpress Training Wheels

How To – Add Tickbox For Blogger Comment Emails

beach19

In setting your blogger blog to be full feed, you might accidentally cancel out the opportunity for your comments area to contain the all important “Notify Me” tick box – this tick box allows your commentators to choose to receive follow up emails when other commentators leave a comment.

bloggerfeed

Go to Settings –> Other –> Site Feed –> From the drop down box, select custom.

bloggerfeed2

Then, leave site feed as full, but turn off blog comment feed and per post comment feeds by selecting none as the option.

bloggerfeed4

Click on Save Settings in the top right hand corner.

bloggerfeed1

When you go back to your comments form, you should now see the tick box in the bottom right hand corner which says “Notify Me”.

bloggerfeed3

When your commentators are logged into Gmail and they click on notify me, it will advise them which email address replies will be sent to, as you see above.

It might be worth letting your commentators know that you have enabled this feature via a quick post.. :)

And there you have it!

Over to you!

Do you like to receive follow up emails for blog comments?

blogging tips, how to guides

10 New Reasons I Unsubscribed From Blogs

but2

With a new blog, I like to test-drive it for 6 months before I declare the blog a keeper and add it to my blogroll. Once a month, I go through the process for blogs added to my feed reader 6 months beforehand – I visit each blog individually and revisit the posts over the past 6 months and then I decide – keep reading, or unsubscribe?

Here are some reasons that have helped me make this decision in recent months.

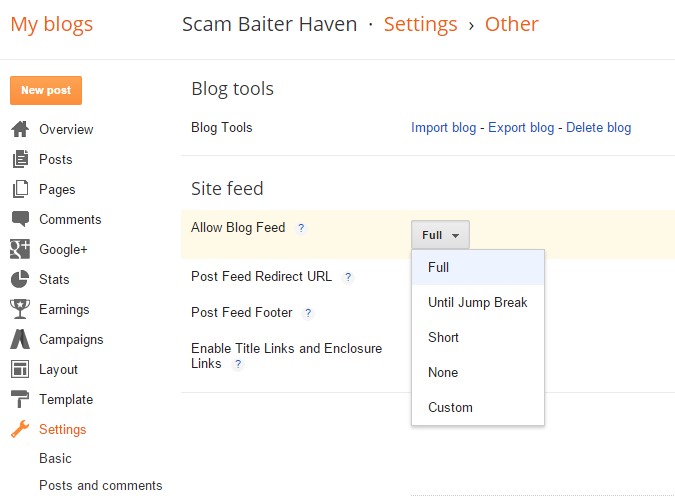
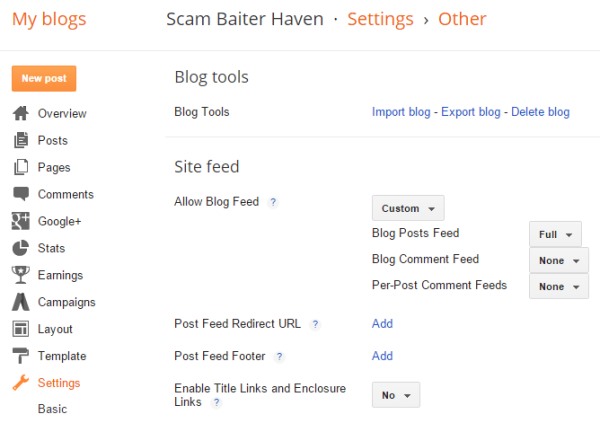
1. Blogs With A Partial Feed

I read a lot of blogs and 85% of them give me a full feed. When a blogger chooses to provide a partial feed, subscribers only see the title and the first 10-50 words of the post. I do not know why anyone would do this – to me it is like cutting off ones blogging nose in order to try and get traffic to their blog.

Bloggers work hard on their content – it is unwise to make their blog readers jump through hoops to read it. SRSLY, think again. Please, provide a full feed.

This is the number one reason I will unsubscribe from a blog. When I subscribe to a new blog and find it is a partial feed, I will still give it the 6 month trial but I already have a feeling what the outcome is most likely going to be. Sometimes people surprise me and end up in my favourites folder instead.

So if you are reading this, bloggers, do you know what kind of blog feed you provide? If not, best you subscribe to your own blog and find out. :)

2. They Never Commented On My Blog

So, I added a blogger to my feed reader, and I really liked their posts, so much so that I became a regular commentator over at their place, leaving a comment on 3-4 posts each week. After a while though, I noticed things were only going one way – theirs. They never once left a comment on my blog.

I don’t know if it was because they couldn’t be bothered clicking through, or whether they did not like my blog – either way, I’m not into one way only relationships. One tiny comment in return for my multitude of comments was all it would have taken to keep me as a reader, and they had a whole six months to do that in!

If I have only left one or two comments in the space of 6 months, then this is not a reason I take into consideration at all. Just in case you were wondering. :)

3. Too Many Photos All The Time

I don’t mind the occasional post with 10 or more images but when every single post is just pictures with a few lines of text, that can be a deal breaker. Especially if the blogger has not re-sized them – large images can take a long time to load, so I’ll get all the text without any images at all and then when I’ve moved on to the next post in that folder, *that* post will keep loading images and bumping what I am trying to read downwards. Annoying!

Please, bloggers, check the size of images before you post them. If you are pulling them right off your camera into your blog then chances are, your readers are getting way too many megapixels as a surprise. Use something like Fast Image Resizer to quickly and easily resize your images.

Not everyone is on a fast internet connection, so it is worth keeping your file size and your readers in mind. :)

4. Too Many GIFS All The Time

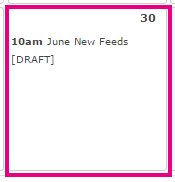
Bloggers, if you have more than one GIF in your post, chances are, you are annoying your readers. What is a GIF? It is like an animated image. Here is a GIF.

kitty

Gifs are all well and good when used sparingly and occasionally, but use too many and they slow right down and do not work as intended. Your funny GIF is not so funny in extra slow motion. It is also not so funny if it comes from a TV show and I have never seen the show it originated from.

I personally limit GIF images to one per post and very rarely at that. :) Of course, it is their blog and a blogger is welcome to post 20 gifs on one post if they want to – that isn’t something I’ll likely enjoy long term, unless their content is incredible.

5. A Lack Of Good Manners

It is fine to disagree with your blog readers politely. It is another thing to belittle, besmirch, or attack a commentator who disagrees with a post. My preference is to treat people who take the time to comment on your blog decently even when they disagree with you, otherwise you risk losing not just the commentator but readers who see the exchange, as well.

Even worse – on occasion I have seen bloggers totally misinterpret a comment someone left and then attack them for having left it!

One the positive side – I have sometimes found bloggers via their excellent manners and wonderful, thoughtful comments in the comments sections of other blogs.

flower

6. Deleted!

A blogger wrote a post people strongly disagreed with – when people disagreed – politely, mind you – with that blogger in the comments, they DELETED the whole post. Whoa! That is so not cool with me. If you write something, stand by it, even if the comments you receive oppose what you wrote.

Be open to the fact that maybe not everyone agrees. Be open minded enough to allow blog commentators to express their opinions. If people have taken the time to thoughtfully disagree with a blogger via a comment, it is NEVER COOL to delete the post in my opinion, and it will make me hit unsubscribe.

7. Deleting Recent Posts –

I had bookmarked several recent posts intending to link to them on my blog at a future time and when I went back to grab the title and link the post, those posts were gone. And these were not deeply personal subjects – these were recipes that the blogger had cooked and provided excellent photos for, or posts where they had travelled and done a lot of interesting commentary and photos. I’m not sure why these bloggers felt these posts had to be deleted but I was disappointed enough to hit unsubscribe.

It is totally normal for a blogger to go back in time and check to see that their blog content from years ago is still relevant and the links and videos still work, and if not and they can’t find new links or videos, it is normal – and good for your blog – to delete those old posts. But to me deleting recent posts feels slightly unusual and somewhat odd to delete stuff they recently wrote.

Maybe this happens all the time and I just don’t notice it, because I’m not trying to link to the deleted post months later. :)

8. I Left A Comment –

Which the blogger did not choose to publish, but they then used my comment to create their next blog post. There is absolutely nothing wrong with spring-boarding a post out of a comment someone left on your blog. If a blogger is going to do that, they could at least have the decency and good manners to publish the comment, reply to it and say something like “I have been thinking about writing a post on that subject for a while, and your comment has inspired me to write it. Look out for my upcoming post on this topic!”

Whenever I write a post here which was inspired by something I saw elsewhere or a comment someone left, I make sure to mention that and if that person has a blog or a specific blog post of theirs inspired me, I link to that in the post. That is just good manners, in my opinion.

9. They Spelled My Name Incorrectly!!

This one is a very specific example. I emailed a blogger once, they replied and spelled my name Snoksred. Oops, I thought! I am super careful not to accidentally spell peoples names wrong – I will copy and paste if there is any doubt at all. But I forgave it, because perhaps it was a mistake..

But I emailed that same blogger a second time, they replied, and spelled my name Snoksred *again* – and that was the moment I looked for that blog in my feedreader, and hit unsubscribe. Once is a mistake, twice is carelessness and to be honest, a little bit offensive. Especially when my sender name is Snoskred, so when they hit reply my name is right there in the body of the email.

10. They Became Brainwashed

They had a wonderful and very interesting blog. But then they got involved with some kind of multi-level marketing company, or perhaps a brand of skincare, or cleaning products, or something they wanted to sell to the world. And now every post they write is All About That Fascinating To Them But Very Boring To Me obsession. I wouldn’t have minded if they had posted about it once a week and still kept the regular amazing content. However that content went AWOL, and now I’ve gone AWOL too.

14 Reasons

I also have an older post on this subject – 14 Reasons Readers Unsubscribe From Your Blog.

Over To You –

Are there reasons you unsubscribe from blogs that I have not listed in my two articles? If yes, leave it in the comments.. :)

blogging tips, feed readers, what not to do

The Timer

path

I am a massive sucker for time management games, the kind you get on your iphone like Diner Dash and Hotel Dash and Wedding Dash. But when it comes to time management in real life, I’m not so good at that. So in 2014 I set myself the goal of becoming better at managing my time.

Last year I had a daily schedule which involved two focused 2 hour sessions – from 10am to midday, and 2pm to 4pm. In some ways this was great but in other ways I found it very limiting. I wanted to set myself a third session in the evening but there were always interruptions in my two hours which sometimes made focusing on a task really difficult..

Sometime in December I stumbled upon a site that mentioned using shorter timed focus sessions. This was actually a pretty revolutionary concept for me and getting annoyed with the limits of 2 x 2 hour sessions, I thought I would give it a try.

There are six basic steps to a short timed session:

1. Choose Your Task

What do you want to achieve today? It could be anything. I’ve set the timer for –

– editing photos
– writing blog posts
– feed reading
– surfing the web
– cleaning and/or decluttering
– household chores
– exercise
– organising the fridge
– cooking
– gaming – especially those addictive can’t walk away from games
– watching the chickens

The last two are especially important to set a timer for, because I can lose hours in a game or just watching the chickens be chickens out there in the yard.

2. Set the timer

I use my mobile phone timer but you can use any kind of timer you like.

I like to set a minimum of 25-55 minutes for most photo editing or writing tasks. You don’t seem to achieve very much in less than 25 minutes at those two tasks. For kitchen or chore tasks I might set 20 minutes with a seated 10 minute break to make a nice round half hour, and then I can catch up on my email in the break.

I am flexible with how long I set the timer for, too. If I have to leave for a appointment in 20 minutes, then a 15 minute timer with 5 minutes of getting ready time means I don’t waste 20 minutes waiting for it to be time to leave.

3. Focus on your task

And ONLY that task. Phones off. Email off. Internet off. TV off. If the doorbell rings, you don’t answer it. I find this freeing in so many ways, especially ignoring the doorbell. I know if it is the package guy because right after the doorbell rings, there is a beep from his scanning the package. That one I’ll get up for. Everyone else can come back another time. No interruptions.

4. Timer Goes Off! Take a short break

If this was a seated writing or computer related task, save what you were working on before you turn off the timer. I’ve lost 55 minutes of writing thanks to a lightning storm before.

This step is *absolutely critical* – I cannot express to you the importance of taking the break the moment that timer rings. . I also recommend getting out of the room you were working in. You are giving your mind a chance to fly free and getting the blood flowing to your limbs again if the task was a seated one.

5. Take a longer break

You’ll find focused timer tasks can be quite tiring mentally. If you kept going for 4-6 hours at a time, not only will you get tired mentally but you’ll find it harder to focus.

6. Plan a reward

You’ve put in the effort so you deserve a reward once you’ve done at least 2 rounds of timed sessions then your break in a row. Your reward could be anything. Mine tend to range from playing a game to a snack to watching a tv show..

Group associated tasks together –

If I gave you 3 tasks that involved three different rooms, and you had to spend some of your focus time moving from room to room to room and back again, you’d find quite a bit of your time spent in moving about.

If you moved those 3 tasks into the same room, you’d save yourself a lot of time.

But only do one task at a time

You’d save even more time if you focused on just one task at a time.

The same goes for almost any task – it is quicker to do one task over and over than to switch from task to task. I find this especially true with things like image editing, writing, taking screenshots for my Breaking Bad episodes.

You can break tasks apart

I might break some tasks down into two separate timed sessions – for example – with the photo editing –

First session = 55 minutes of going through the photo folders, picking out images I want to edit and saving them into one folder

When the buzzer goes for the break, I get up and make a drink or have a quick walk around – my mind by this time has probably already moved onto how I want to edit those photos I have picked,

Second session = 55 minutes focused on image editing.

And even within this session I may break this down further. EG cropping all the images *then* making all the images the size I want *then* using tools to enhance the focus or colour *then* saving them all.

Because I have broken the two tasks into separate sessions, I find I get a lot more done.

About Snoskred, blogging tips, life lessons, Snoskred hearts, time management

Thoughts For Bloggers

pan3

Tomorrow is the last day of August, so the post scheduled for tomorrow is New Reads for August.

It has been a massive month of adding blogs to the feedreader. The list I will be posting tomorrow is very long, over 100 new blogs.

So I’ve probably been to over 600 blogs this month – for every one I added, there were at least 5 I did not add. Not just anyone gets to jump into my feed reader.

When I added a new blog –

I have visited that blog and read back several pages – at least 20 posts. And let me tell you, some blogs do not make this an easy thing to do.

Using read more tags means I have to open up a bunch of tabs to read the posts. If I already have a bunch of tabs open, I’m probably not going to bother unless the snippets are enticing enough to make me open that blog in a new window and tab up a storm. Sorry. Those read more tags made it too hard for me to get to know that blogger. :(

I read back –

– liked what I saw, then added that blog to my feed reader.

And let me tell you, sometimes that doesn’t work out so well. Some blogs don’t have a feed associated with them! I occasionally have to do all kinds of tinkering to be able to get a feed for some blogs. Sometimes my intent to add a blog ends up with me giving up. Sometimes I’ll send an email to the blogger to mention what kind of issue I had. Sometimes not. It depends on how much time I have.

So, if you are a blogger reading this!

Here is a thought – use a feed reader to read blogs because it makes things quicker and easier when it comes to following the blogs you love – add your own feed to the feed reader so you can keep an eye on your posts and make sure it is showing up how you intended.

Don’t use a feed reader? Need One?

Last month Zazzy suggested Inoreader. Here is a great post on how to use Inoreader. They also seem to have forums and support available.

Some blogs use a partial feed.

That might end our relationship right there. I read over 400 – possibly close to 500 – blogs via my feed reader. If you are going to make me click through to your blog for every post in full, I’m probably out. Even if you are an amazing writer. Even if I really love what I saw on your blog.

If I *really* love your content –

As in I can’t live without it – and you use a partial feed, I recently found a way to get around it.

But this has some serious drawbacks –

– it is unreliable – I’ve been testing it by leaving the partial feeds in my reader next to the full feed and presently none of the full feed posts have arrived while partial ones have

– if people are using this, it means they are not subscribed to *your* blog, they are subscribed to a third party service

– it takes away your ability to get stats on your feed if people are not using your feed

Not to mention –

Do you really want to make your readers jump through hoops to get your content? I’m not a performing dog. :) If I like your post and I have the time, I’m going to click through and comment.

If you give me a tiny snippet and what is there does not seem interesting, I’m not clicking through. Sorry. :( A partial feed can only be a lose-lose when you are a blogger who wants people to read your writing. You are frustrating your readers, and that content you worked so hard on is likely going to be left unread.

You do not need to use a partial feed to get me to your blog – in fact it is more likely to turn me off as a reader from the get-go.

If the reason you are using a partial feed is because you are worried about content scraping, there are things you can do that do not involve a partial feed – like these –

7 Tips and Tools to Stop Content Thieves in their Tracks

Beginner’s Guide to Preventing Blog Content Scraping in WordPress

Note this quote from the Beginners Guide article –

Note: We have full feed because we care more about our RSS readers than the spammers.

Blog Design –

There are some terrible blog designs out there in the wilderness. Egads, people. Some of the stuff I saw was painful to my eyebulbs. But I will not like to re-invent the wheel, I wrote about this some time back and I have gone through and updated the post, removing dead links and slightly changing the text – Blog Design – Open Your Eyes.

blogging tips

Daily WordPress Tasks

When I set up a new WordPress blog, I always set it to moderate first time commentors. It turns out this isn’t something Blogger users are used to. On Blogger you had the choice of moderate all the time, or not at all. WordPress has a lot more options and a lot more control. But this also means you have a few things you need to do regularly – daily at the least. I tend to do these tasks several times during each day.

Daily Task #1 –

Comment Moderation

There’s some very good reasons that you want to have moderation for the first comment someone makes to your blog. You want to stop spammers before they even get started. You may want to welcome legitimate first time commentors by sending them a personal email, and the email you get from WordPress is a good heads up to remind you to do it. It also contains the email address and website of a commentor to make it easy for you to email and visit their site. The email you get looks like this – click for a larger view. You can click for a larger view with most of the images in this post.

Wordpress Email

There are links within the email you can click as you can see. When you log in to your WordPress Dashboard, you can also see if you have any comments in moderation from that screen.

Wordpress Comments In Moderation

Clicking on comments in moderation will take you to the moderation queue. It looks like this –

Moderation Queue

So as you can see in that image there are four options underneath a comment.

  • Approve will let the comment go live on your blog so everyone can see it.
  • Spam marks the comment as spam and places it in the Akismet Spam folder
  • Delete is useful if someone accidentally submitted a comment twice. But remember, NEVER delete spam – always mark it as spam so Akismet can learn to identify it in the future.
  • No Action means nothing is done and the comment remains in the moderation queue.

Daily Task #2 –

Akismet Spam

Akismet is a wonderful thing. However it *is* open to abuse by bloggers who –

  • mark comments as spam when they are not really spam
  • mark comments as spam because they do not like the commentor

It also suffers as a spam filter when bloggers don’t regularly check their Akismet spam trap to make sure everything in there is spam. You do not get an email from WordPress to let you know when a comment has ended up in Akismet.

I believe it is part of your job as a blogger to make sure legitimate comments from your readers aren’t going into Akismet by mistake.

So how do you check it? I normally do it when I moderate a comment because Akismet is in the comments section and if you’ve just moderated a comment you’re already in there. You can see how many comments are in Akismet. Simply click on Akismet Spam and you’ll end up at this page –
Akismet Spam
Read through the comments. If there is anything there which you do not consider spam – and sometimes there will be, my comments regularly end up in Akismet, I will not speculate as to why! – you simply tick not spam, then scroll to the bottom of the page and click despam marked comments.
Despam Marked Comments
If all the comments are spam, you can click on delete all, and they will forever disappear. I find it is easier to delete the spam comments on the spot but you can choose to let them build up and Akismet will automatically delete them after 15 days.

There You Have It –

The above two things are fairly essential daily tasks on a WordPress blog and you may even find yourself doing them 4 or more times a day if you’re near the computer and you get an email to say a comment needs moderating, or maybe if you’re writing a post and you end up back at the dashboard and see there are comments to be moderated.

You Can Choose –

If you want more or less moderation on your blog you can go in and change the options. Go to Options (light blue) –> Discussion (dark blue) and you will see this screen.

Discussion Options

It is your blog, and you can set whatever settings you like. The way I set it is simply the best way I have found to manage comments for my blog. Your needs might be different. Just be careful because by making changes to this screen you may be opening up your blog to the spammers.

How Do You Manage It?

Let me know in the comments section how you manage comments on your blog. Do you moderate them once a day or more often? Do you have moderation for all comments? If yes, do you think you could try moderation for first time commentors only? Do you find that you delete a lot of comments from your regular commentors?

Any Questions?

Ask away by leaving a comment!

blogging tips, wordpress, Wordpress Training Wheels