How To – Add A WordPress.com Follow Button To Self Hosted WordPress.

steps

Why yes, that is a super long title but I have posted it in the hope that it will end up on the very first page of multiple search engines because I searched for a how-to do this for several hours the other day with zero luck..

Giving up on searching via Dogpile, Google, etc, I then searched wordpress.org support and also the support forum for the Jetpack plugin. I could find plenty of people asking how to do this, and zero answers. I ended up having to lodge a support ticket and I got an answer back which helped me work it out.

A lot of people when they receive the answer seem to keep it to themselves – not updating their support threads with the answer – which is probably why I could not find it, no matter how hard I searched. So here is the answer for anyone looking for it!

Important note – for this to work, you need to have the Jetpack plugin enabled on your self hosted wordpress blog.

step1

1. Go to Jetpack –> Settings.

step2

2. Activate JSON API within Jetpack – also take note, you will need to leave this activated for the button to continue to work.

step3

3. Visit the Follow Button Creation page.

step4

4. Scroll down to the area where you can enter in your blog URL. Enter it, then decide if you want to show how many followers you have, and whether you want to show your blog name. If you have a long blog name like mine, the button will be super long! Then, hit generate.

step5

5. Copy the code which has been generated.

step6

6. Go into your add widget area within appearance.

final

7. Paste the code into a text widget on your self-hosted wordpress blog. Hit save, and you are done!

Happy moments! :) And Whew, thank the deities that is over.

But I’m on wordpress.com?

Well then, this is super easy. :)

wp1

1. In Appearance –> Widgets – scroll down the page until you see Follow Button.

wp2

2. Drag and drop the follow button over to your sidebar.

wp3

3. Click on the little drop down arrow to see the options, adjust your options to suit and then click on save.

Done!

blogging tips, how to guides, wordpress, Wordpress Training Wheels

How To – Easy Blogroll Linking With WordPress.

I’ve learnt a nifty little trick which can save you a lot of time. ;) Here tis. Some of the following images are thumbnails – click them for a larger view.

Easy Blogroll Linking With WordPress.

1. Click on Blogroll (light blue menu) and then Add Link (dark blue menu)

Easy Blogroll Linking With WordPress.

2. You’ll find yourself in the Add Link screen. You can manually add a link by copying and pasting the link, and then putting in the title you would like the link to have. But there is an easier way. Though it may not seem easier, it is once you have it all set up.
Easy Blogroll Linking With WordPress.

3. Just a little way down the Add Link screen, you will see “Add Link Bookmarklet”. This is basically a quick way to add links to your blogroll. You put it into your favourites (Internet Explorer) or bookmarks (Mozilla Firefox and other browsers). When you are at a website and you want to add a link to that website, you simply choose the “link this” favourite/bookmark and it makes the “Add Link” window pop up – already with the link and the title of the website all filled in for you.

So what you need to do is rightclick on Add Link, and then select – “Add to Favorites…” (Internet Explorer) “Bookmark This Link…” (Mozilla Firefox and others)

Easy Blogroll Linking With WordPress.

4. This box will pop up, asking you to choose where you would like to put the bookmark.

Easy Blogroll Linking With WordPress.

5. Me personally, I use a “Bookmarks Toolbar” so that I can have the bookmarks I use regularly accessible by one simple click. So if you do the same, you can put “Link This” in your Bookmarks Toolbar. More info on customising toolbars with firefox can be found here as well as in the help section within your browser.

You can also do the same thing with Internet Explorer – here are the instructions for IE7 – and by the way, if you are using anything less than Internet Explorer 7, you should upgrade. Most websites do not look as they should in Internet Explorer 6 and below. For more info on that see this thread on the Aussie Bloggers Forum.

What this all means is, when I want to add a link, I simply click on link this in my toolbar.

Easy Blogroll Linking With WordPress.

6. When you click on link this, you will see a new window pop up, and it will contain the link and the title of the website. Sometimes you may not want to use the full title, so you can edit that before you click on Add Link. If you are using categories within your blogroll, you can also choose what category you would like the link to be placed in.

I Don’t Have A Bookmarks Toolbar?

Easy Blogroll Linking With WordPress.

In case you don’t see your bookmarks toolbar – you may need to change a setting in your browser. For those using Internet Explorer – click on View –> Toolbars –> then make sure that there is a tick next to links.

Easy Blogroll Linking With WordPress.

To see your bookmarks toolbar in Mozilla Firefox, click on View–> Toolbars –> and make sure there is a tick next to bookmarks toolbar – if not then select bookmarks toolbar with your mouse and the toolbar will appear on your browser screen.

Questions? Comments?

I’ll try to answer any questions you may have – leave a comment with your question!

Wordpress Training Wheels

Top Commentators Plugin – Rolled Out To Blogs I Host.

One of the bloggers I’m hosting asked me to find a top commentators plugin for wordpress. Let it be known that I do not take adding plugins lightly. I want to test them thoroughly on my test blog before they go near the blog of someone else and that can take a bit of time given how busy I am. I eventually found one that did not break the blog or any of the other plugins, and I have uploaded this plugin to all the blogs I host.

I have already installed this plugin on a couple of the blogs when I was in their Admin screen to do something else. If you have a top commentator widget in your sidebar you don’t need to follow these instructions but it is handy to know where you can edit the options, so read it anyway. ;)

Now you have to do a little bit of work to make it work. :) Here’s what you do.

Plugins menu in your WordPress Admin screen

1. Go to the Plugins menu in your WordPress Admin area.

Top Commentators Widget in the Plugin screen

2. Scroll down until you see Top Commentators Widget – when you find it, click on activate.

Presentation - Widgets

3. Go to Presentation – Widgets.

Widget

4. Drag and drop the top commentators widget to the spot in your sidebar where you would like to place it.

Edit Widget Options

5. Click on the three lines underneath the blue line to bring up the pop up box.

Popup Box

6.  Enter in the settings you want. Here you see my settings as they are – you may want to copy mine if you’re not sure what to put in.

Save Changes

7. Finally, click on save changes in the widgets screen.

And there you have it – you’re all set up. Enjoy!

Wordpress Training Wheels

Quick WordPress Training Wheels – Publish In The Future

Undoubtedly this particular feature of WordPress is the thing that made me decide to switch over because I like to write things ahead of time. By the end of November I already had the first 3 weeks of the December Song For Today posts pre-published.

However I don’t just use it for that – I use publish in the future as a tool to check I got everything looking the way I want it in my post. Every post I write – including this one – will be set to publish 10 or 20 minutes after the time I hit the publish button. That means I can take a quick look at the post before it goes live and just double check it the formatting and the spelling for one last time.

So here is what I wrote down and have stuck to the side of my screen for easy reference. Write this down.

To publish in future –

  • Check edit timestamp box
  • Set date in future
  • Post status to published
  • Hit publish

And now you get a version with screenshots. :)

To Publish In Future –

Here’s a picture of the Write Post screen.

How to publish in the future with WordPress
The bit of the screen you’re looking for is in the pink box with the arrow pointing to it. Once you have finished writing your post –

How to publish in the future with WordPress

Tick the edit timestamp box and change the time to be the time you want the post to go live on your blog.

How to publish in the future with WordPress

Change the post status from draft to published.

How to publish in the future with WordPress

Hit the publish button.

And you’re done. Seriously!

But Just Remember –

If you forget to change the date and hit publish, everyone will see what you posted *now*. So be careful. ;)

Wordpress Training Wheels

All About FTP.

When we organise webspace for someone, we offer them the option of FTP access. Many people who I’ve offered it to did not know what it was or how to use it. So I asked Sephy to take a moment and write one of his great how to information posts. Sephy has a knack of taking something scary and changing it to something you can understand, so if you are one of the people we are hosting a site for you will want to read his post.

How-to: Upload files using FTP

Resizing Images

Image Resizing Made Simple – in case you missed Sephy’s explanation of how to easily resize images.

how to guides, Wordpress Training Wheels

Just Another (Spammy) Day At The Office

So one sits down at the computer this morning only to find several spam comments in the moderation queue. It seems the drug spammers have found my site again. But I – and all the bloggers who I have created wordpress blogs for – have a secret weapon in the fight against spammers. So secret in fact that I haven’t told them much about it or how to use it. So that is why I am writing this post.

First let us find out what drug spam looks like.

Spam

You see the words underlined in red in the URL’s? Those are the drug names. They will always be spelled right. You can block the drug words within the comments themselves using the TanTan Noodles Simple Spam Filter plugin. If you only did that, you would start to see the drug names spelled wrong within the comments. The spam would not stop. So my Other Half modified our version of TanTan Noodles to enable you to block words within the URL’s. Here’s how you do it.

Tan Tan Noodles Simple Spam Filter

First of all, where do you find this spam filter?

Spam Filter

Comments (light blue)

Spam Filter (dark blue)

Here is the screen you will see when you click on spam filter – yours may not have all the words mine does, though.

Spam

How To Block Spam –

All you need to do is enter in the word you want to block. If it is a word that was in the URL, put it under banned patterns. If it is a word found within the comments, put it into the banned words list. The plugin looks at your Akismet spam and puts words that you may want to add at the bottom of the page. You can click on those words to add them to the banned words list. Once you have finished putting the words in, click on save rules. Then you’re done – and so are the spammers.

What will the spammers see?

Not a great deal, because they are usually robots or computer scripts, not real people. But if they were real people they would get this screen –

Spam

If they are a robot or a computer script, they can’t click on the button. That is how the spam gets blocked. From time to time it may be possible that one of your regular commentors will use a banned word and they will see this screen. It tends to freak them out a little. So it is a good idea to try and keep the banned words to words not used in every day comments.

Take Care With Banned Words.

You will see a bit of spam that simply says “Hi, great site” – I blocked the word great for a while but then I unblocked it after a commentor told me they saw the screen and they weren’t sure what to do..  it is easier for me to manually handle that kind of spam than to scare my commentors. They don’t show up anywhere near as often as the drug spammers do. Overnight I had 8 drug spam comments and another 2 more showed up before I put in the new drug words.

Any Questions?

If you have questions, the comments section is open. Feel free to ask away!

Wordpress Training Wheels

WordPress – Writing A Post.

There’s a few basic things you need to know in order to write a post in WordPress. We’re going to take a look at the write posts screen and explore a couple of the features. This post ended up being a lot longer than I expected, so check back tomorrow for more on writing a post, in particular what options you have in the right sidebar and how to post in the future.

Where Is Write Post?

Write WordPress Post

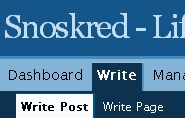
Click on Write (light blue)

Click on Write Post (dark blue)

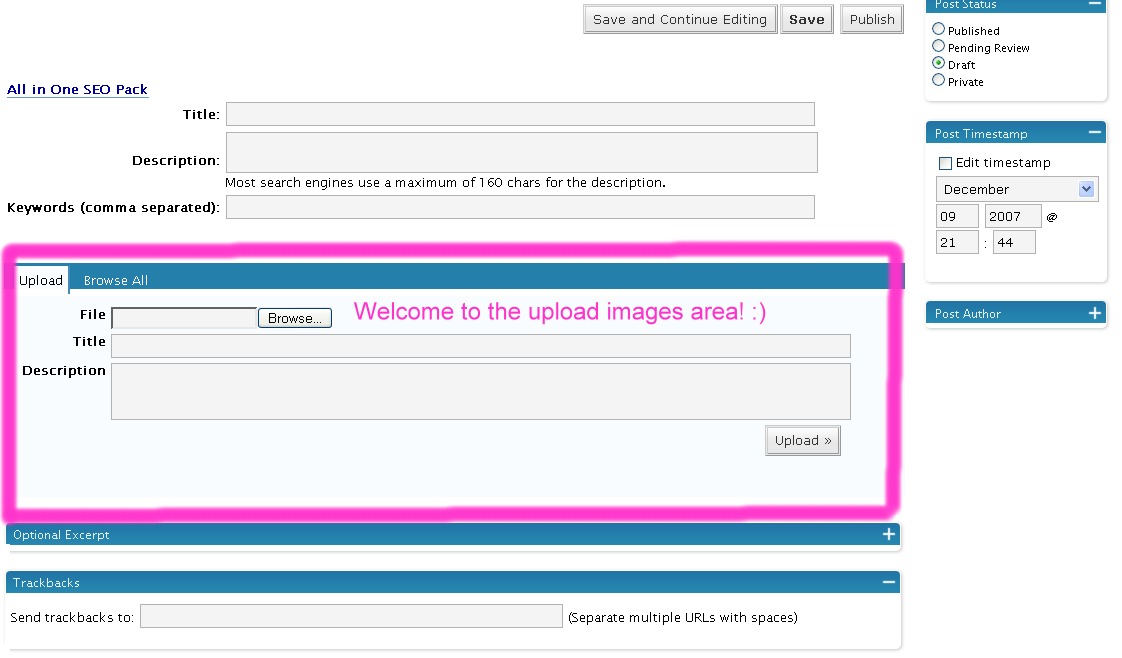
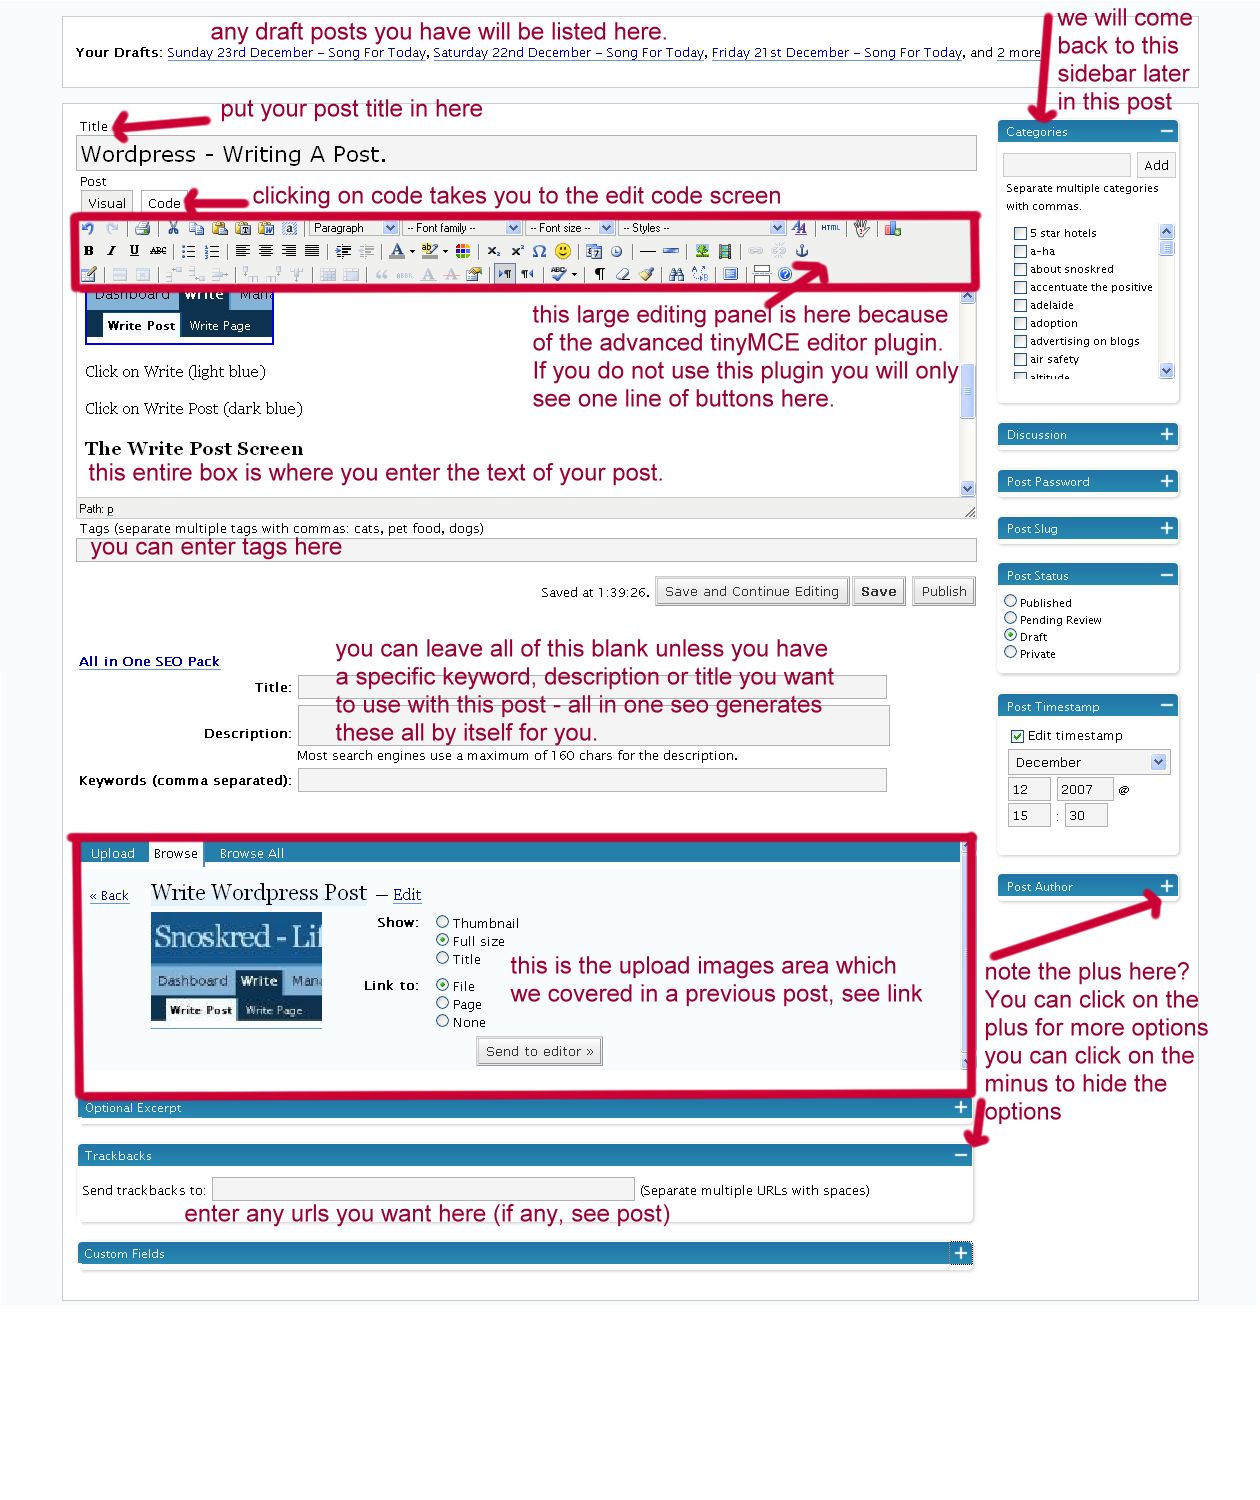
The Write Post Screen

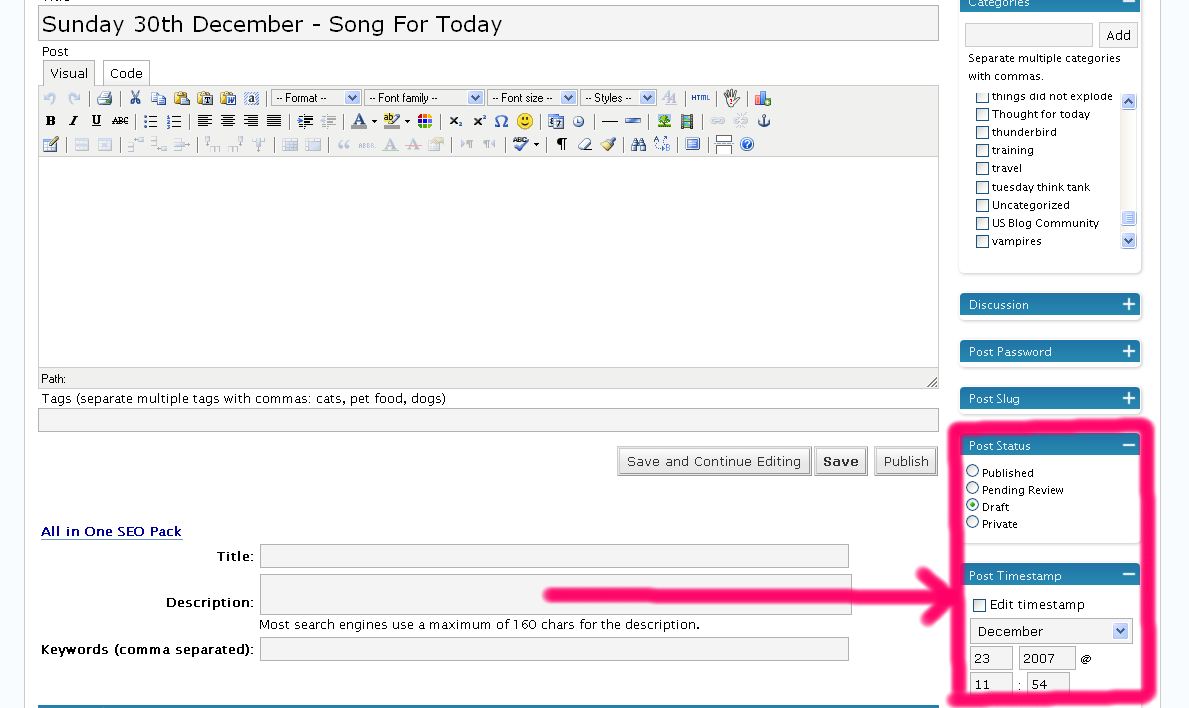
The write post screen may look confusing to those of you switching over from Blogger however it is very similar to what you had over there. It does contain more options. Here is an image of how my write post screen looks –

Wordpress Write Post Page

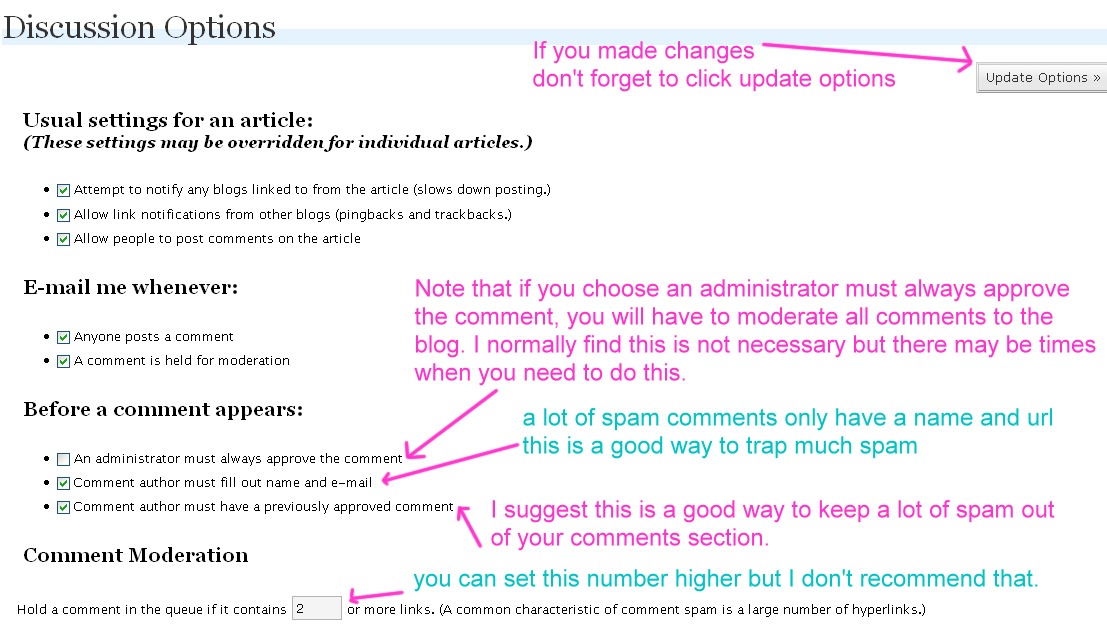
You can customise the height of the editing box and I have done that, so yours may look a little different. If you want to make your editing box taller, go to –

options (light blue)

writing (dark blue)

Size of the post box – I believe the default is 10, so you can adjust the number upwards if you want it bigger. Mine is set to 15.

The Advanced tinyMCE editor.

If you are using the Advanced tinyMCE editor, you can tell what the buttons do simply by hovering your mouse over them. There are some buttons you will use more than other buttons. Headings and adding links are two ones I constantly use, so let us take a look at how they work.

Headings.

In HTML you have a couple of choices when it comes to headings. The best choice and the one that means less work for you is to use the header tags. These tags are also used by some search engine bots when they visit your site to pick up keywords so it is a good idea to use the header tags rather than make the text bigger and bold manually.

Advanced tinyMCE gives you a little drop down box where you can pick the header tags.

Headings Drop Down Box

Simply highlight the text you want as a heading, then click on the little arrow to drop the box down, and choose what header tag you want to use. I highly recommend you go in and play with this. Perhaps make yourself a draft post (don’t post it!) that looks like this –

Header 1

Header 2

Header 3

Header 4

Header 5
Header 6

Just so you can see what they look like. You can preview a post at any time by clicking on preview. Don’t worry, it won’t take you away from the page you are writing the post on. Mine opens in a new tab, yours may open in a new window.

Adding Links

This is something we bloggers do constantly. You have a lot of extra options thanks to the Advanced tinyMCE editor. Some of them are quite complicated and I don’t know what they do. I’ll only mention the ones you are most likely to need or use. Here’s how you make a link.

Highlight Text

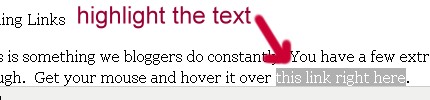
Use your mouse to highlight the text you want to put a link on.

Insert/edit link

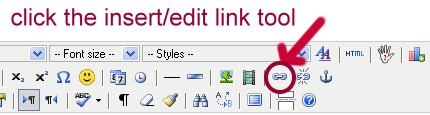
Click on Insert/edit link, which is the little chain link icon, I put a circle around it for you.

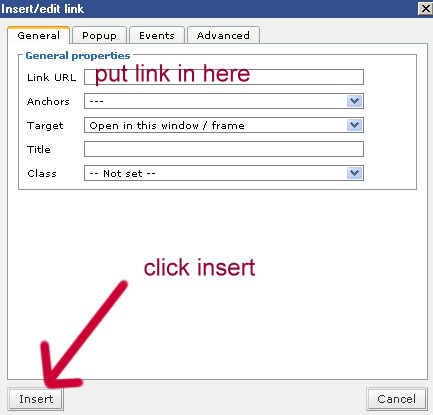
When you do that a little box will pop up. If you want, all you need to do is enter in the link where it says link url, click insert, and you’re done.

Basic linking

Some bloggers want their links to open in a new window so that when a reader clicks on the link, it does not take them away from their site. Me personally, I don’t recommend doing this. In general web etiquette it is considered a bit rude to force people to open links in a new window. I know if I middle click on a link it will open in a new window. I know I can right click and open it in a new tab if I want to. I also know how to get back to the site I was on if I click away from it. But just in case you want to do it –

Open link in new window

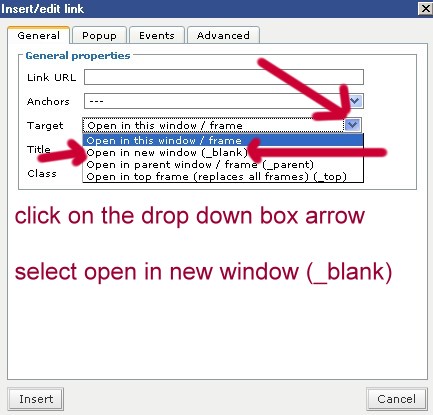
Click on the little drop down box arrow, and select open link in new window.

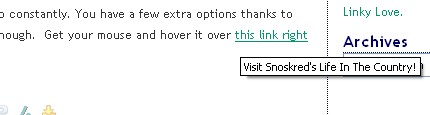
The final linking thing I will show you is how to give your link a title. All you have to do is enter in some text where it says title. How easy is that!

Link Title

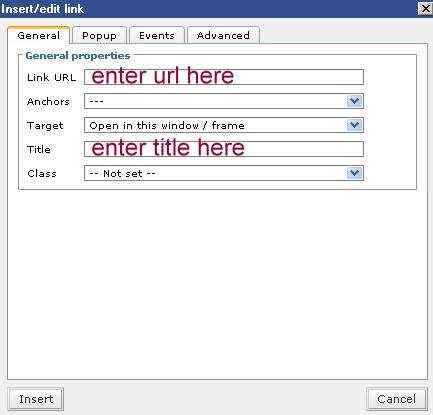
Then click insert, and you’re done. Want to see what it does? Hover your mouse over this link right here. You see how a little box pops up with text in it? Like this?

Hover mouse

Of course there are a lot more features in the write post screen. I’ll be talking about them more over the next few days.

Other Great Links –

Image Resizing Made Simple – in case you missed Sephy’s explanation of how to easily resize images.
How to Add a YouTube Video to a WordPress Blog – Note that the youtube brackets plugin is a part of the standard package I give you when I install your wordpress blog. Great post Meg, I was going to cover it at some point and now I don’t need to. ;) Yay less work for me!

Wordpress Training Wheels

WordPress – Uploading An Image

This is a quick one for Lightening. It is simple once you know how – and know a couple of important rules. The most important one is this –

WordPress DOES NOT resize your pictures the way Blogger used to.

You have two options. You can show a thumbnail and people can click for a larger image.
Enter Title Here - when people hover, they will see this
Or make sure your images are less wide than your content box. I generally try to stick to around 430 wide for my images.
Enter Title Here - when people hover, they will see this
Realistically, people don’t click on images to make them bigger unless they are really small, this much I can tell you from experience. So I personally think the options here are excellent.

Uploading An Image

Scroll down the write post page until you come to the upload images box. It is just below All In One SEO if you have that installed. Where does it put the images when you upload them? On your server space that comes with your blog, usually into your wp-content/images folder.

Image Upload Box on WordPress

Click on browse.

Click On Browse

The following box will popup. Find the image you want to upload which should be on your computer somewhere and click on open.
Popup Box
Once you have done this the popup box will go away. Now if you did not want a title or description for your photo, you could press upload now and it would upload the image. However putting a title on your photo means that when someone hovers their mouse over it they will see the title you put in, and it means the search bots will pick that title up. If you look at my song of the day photos you will see they always have a title that tells you what the photo is actually of. So it is worth putting a title in.

Title and Description

Once you have entered your title and a description if you want one, click on upload. This may take a few moments depending on the size of your image. Once it is done you will see this –
Image Upload Box on WordPress
You can choose if you want a thumbnail or a full size image. Just be aware that if your full size image is huge, it may throw out your sidebars. So unless you have made the image smaller than your content area, always choose thumbnail.

I’m not sure what the link to options actually do. I am sure someone reading this does, and if they could explain it in the comments I’d appreciate it greatly. ;) I just stick to the one I know, which is file.

Questions? Comments?

The comments section is open, so feel free to ask any questions you may have. Hopefully I have the answers! :)

Wordpress Training Wheels

Daily WordPress Tasks

When I set up a new WordPress blog, I always set it to moderate first time commentors. It turns out this isn’t something Blogger users are used to. On Blogger you had the choice of moderate all the time, or not at all. WordPress has a lot more options and a lot more control. But this also means you have a few things you need to do regularly – daily at the least. I tend to do these tasks several times during each day.

Daily Task #1 –

Comment Moderation

There’s some very good reasons that you want to have moderation for the first comment someone makes to your blog. You want to stop spammers before they even get started. You may want to welcome legitimate first time commentors by sending them a personal email, and the email you get from WordPress is a good heads up to remind you to do it. It also contains the email address and website of a commentor to make it easy for you to email and visit their site. The email you get looks like this – click for a larger view. You can click for a larger view with most of the images in this post.

Wordpress Email

There are links within the email you can click as you can see. When you log in to your WordPress Dashboard, you can also see if you have any comments in moderation from that screen.

Wordpress Comments In Moderation

Clicking on comments in moderation will take you to the moderation queue. It looks like this –

Moderation Queue

So as you can see in that image there are four options underneath a comment.

  • Approve will let the comment go live on your blog so everyone can see it.
  • Spam marks the comment as spam and places it in the Akismet Spam folder
  • Delete is useful if someone accidentally submitted a comment twice. But remember, NEVER delete spam – always mark it as spam so Akismet can learn to identify it in the future.
  • No Action means nothing is done and the comment remains in the moderation queue.

Daily Task #2 –

Akismet Spam

Akismet is a wonderful thing. However it *is* open to abuse by bloggers who –

  • mark comments as spam when they are not really spam
  • mark comments as spam because they do not like the commentor

It also suffers as a spam filter when bloggers don’t regularly check their Akismet spam trap to make sure everything in there is spam. You do not get an email from WordPress to let you know when a comment has ended up in Akismet.

I believe it is part of your job as a blogger to make sure legitimate comments from your readers aren’t going into Akismet by mistake.

So how do you check it? I normally do it when I moderate a comment because Akismet is in the comments section and if you’ve just moderated a comment you’re already in there. You can see how many comments are in Akismet. Simply click on Akismet Spam and you’ll end up at this page –
Akismet Spam
Read through the comments. If there is anything there which you do not consider spam – and sometimes there will be, my comments regularly end up in Akismet, I will not speculate as to why! – you simply tick not spam, then scroll to the bottom of the page and click despam marked comments.
Despam Marked Comments
If all the comments are spam, you can click on delete all, and they will forever disappear. I find it is easier to delete the spam comments on the spot but you can choose to let them build up and Akismet will automatically delete them after 15 days.

There You Have It –

The above two things are fairly essential daily tasks on a WordPress blog and you may even find yourself doing them 4 or more times a day if you’re near the computer and you get an email to say a comment needs moderating, or maybe if you’re writing a post and you end up back at the dashboard and see there are comments to be moderated.

You Can Choose –

If you want more or less moderation on your blog you can go in and change the options. Go to Options (light blue) –> Discussion (dark blue) and you will see this screen.

Discussion Options

It is your blog, and you can set whatever settings you like. The way I set it is simply the best way I have found to manage comments for my blog. Your needs might be different. Just be careful because by making changes to this screen you may be opening up your blog to the spammers.

How Do You Manage It?

Let me know in the comments section how you manage comments on your blog. Do you moderate them once a day or more often? Do you have moderation for all comments? If yes, do you think you could try moderation for first time commentors only? Do you find that you delete a lot of comments from your regular commentors?

Any Questions?

Ask away by leaving a comment!

blogging tips, wordpress, Wordpress Training Wheels