How To: Claim Your Blog At Bloglovin’

beginbloglovin

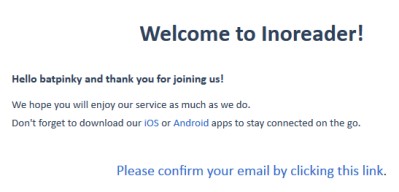
First up, you will want to create an account over at Bloglovin’ if you do not already have one. You only need to enter a name, email address, and password to create your account. You’ll need to confirm your email before proceeding. Make sure to check your spam as it may land there :)

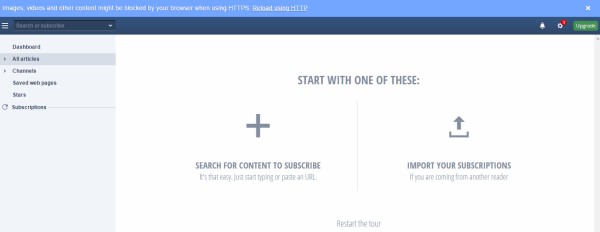
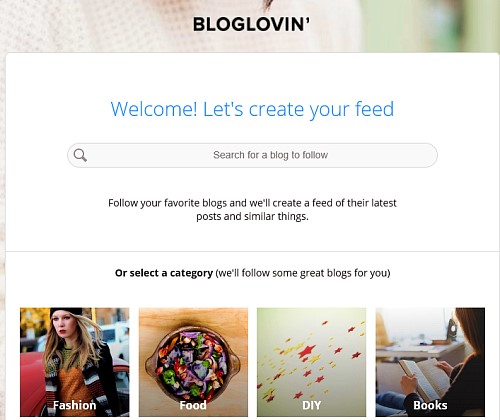
Click on the link and yay, you’ve created an account! Once you have done that, you will arrive at a page asking you to begin creating your feed.

bloglovin1

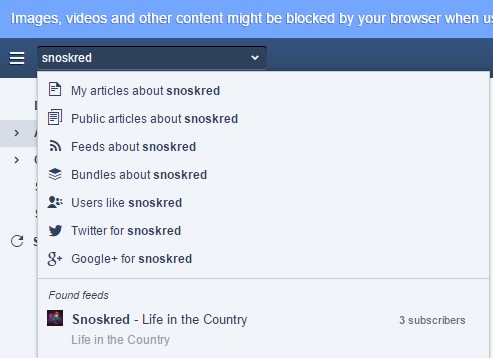
Always, always put your own blog in first, is my advice. :) You want to see how your blog looks and make sure your posted content is coming through as you intend it to appear.

bloglovin2

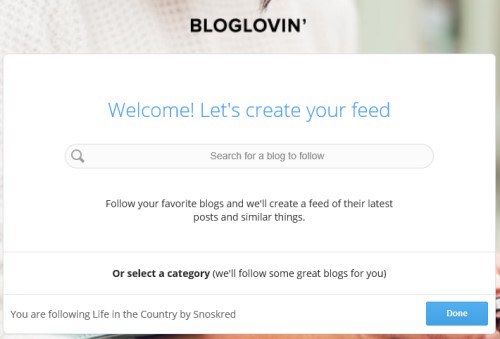
To get past this screen, you want to enter in one blog quickly and then you can click on done and head to your profile which is where you can claim your blog.

bloglovinprof

Click on the profile picture in the top right hand corner, or select “Profile” from the drop down menu.

bloglovinprofile

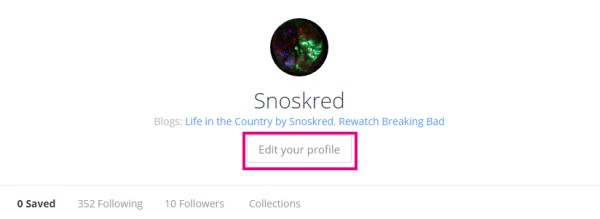
This takes you to your profile. Click on Edit Your Profile. In this case I have created a test profile so it will look exactly like you’ll see it. Meet Testy, my tester.

blogsbyme

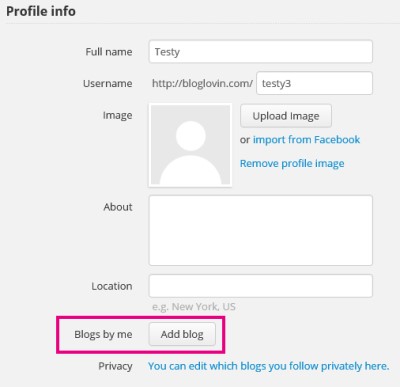
Scroll down the page until you see profile info, and look for the Blogs by me section. Click on Add Blog.

claimblog

A popup box will appear. Type in the name of your blog, and it will go off and search, eventually coming back with a list like this –

searching

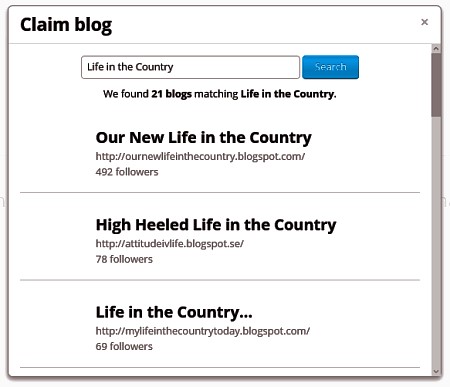
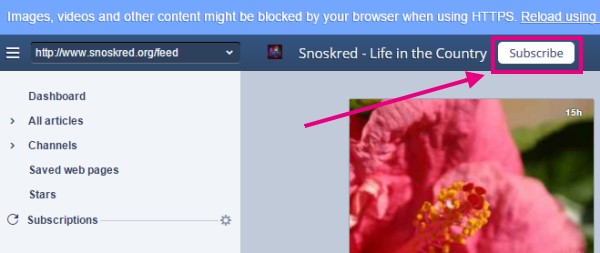
If your blog is listed there click on it and you will end up at a new screen that looks like this –

claiming

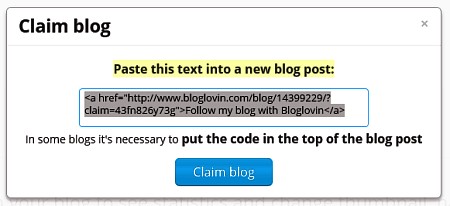
In a new tab or window, copy and paste the code into a new blog post, and publish the post. When the post is published, click on claim blog, and Bloglovin will check your blog for the post, thus identifying you as the owner of the blog.

scambaiterhaven

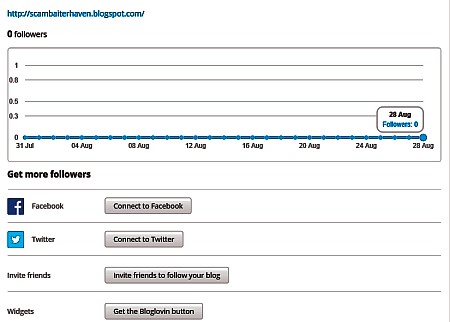
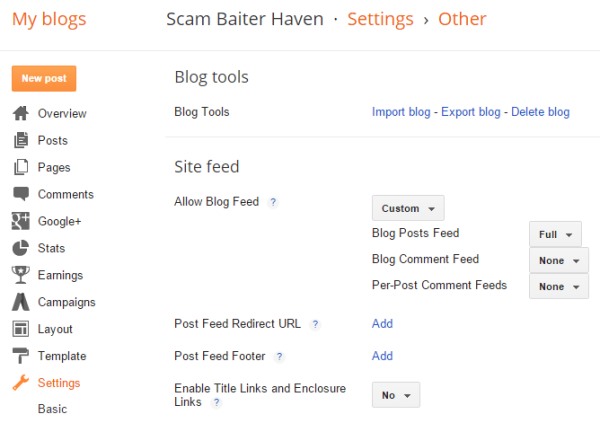
I did mine a long time ago so for the purposes of this post, I am claiming a blog I don’t use much anymore, Scambaiter Haven. This is the screen you’ll end up at, once your blog is claimed. You’ll also receive an email. If you already have followers, you’ll see a lovely graph of how many followers you have.

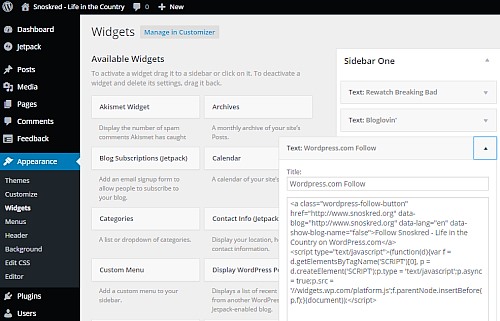
You might want to go into your profile and add in some more stuff about yourself, put in an image, etc. You might also want to add the widget to your blog sidebar, and follow some bloggers over there.

notifications

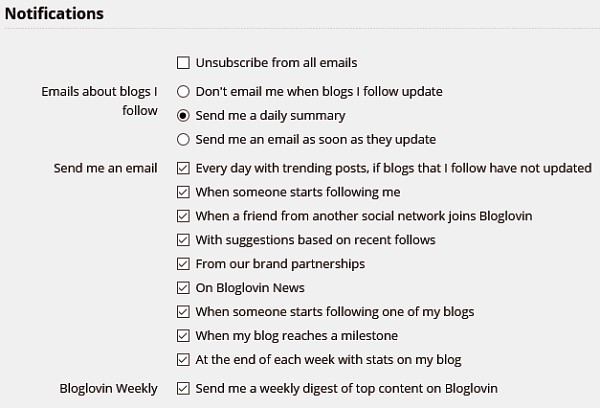
I also recommend checking the settings screen because it has a lot of emails pre-ticked to send to you. I unticked a lot of these, though I do get the daily summary of bloggers I follow, email when someone starts following me so that I can follow them back, and the weekly stats post.

In conclusion –

You might be reading this thinking.. why do I want to claim my blog, I don’t really want to sign up for yet another thing, I already have a feed reader why would I want to use this one, etc.

Claiming your blog isn’t for *you* so much as it is for the people who already use Bloglovin’ who might want to follow you. It is also a way new readers can find your blog.

Chances are you already have some people over there following you, and you’ve got no idea who those people are because you have not claimed your blog. :) They might have a blog, and if they like your blog, maybe you will like theirs.

As I said in yesterday’s post, this month I am doing some exploring over on Bloglovin’ and at the end of the month you’ll hear all about it plus see all the new blogs I found there.

Over to you –

Will you claim your blog over at Bloglovin’? :)

feed readers, how to guides

Blogger, Don’t You Lose My Comment!

460

I think I have finally learned my lesson in regards to commenting on Blogger / Blogspot / Google blogs – always, *always* copy the comment I have written before clicking on Publish! That way, if Blogger loses my comment, I can at least paste it back in again.

In the course of learning this lesson, I think I have unearthed a couple of clues that might tell you when you will lose your comment for certain. And here they are.

1. Missing Notify Me Box

blogger1b

If you are leaving a comment on a blog you are familiar with and you have used the notify me tickbox before.. when you find the notify me box is missing, that is a sign that Blogger does not know who you are, and therefore does not know where it should email any future comments.

blogger1c

If the notify me box is missing, this is a sign that when you hit publish, your comment will disappear into the ether never to be seen again.

blogger1d

Another way to double check if the notify me box is present is to make sure when you tick the box, the correct email address appears, as you see above.

2. Missing Account Name

blogger1a

If your Google account name is missing from the Comment as: area, this is another sign that blogger does not know who you are, and therefore cannot leave a comment for you, unless you pick one of the other options. It should look like this –

blogger1e

If it doesn’t look like this, you may not be signed in properly. If you hit publish, your comment will probably disappear into the ether never to be seen again.

However, it is important to note, you can be signed in properly but Blogger can still not know who you and lose your comment. Which leads me back to my number one tip –

3. Regardless, COPY!

blogger1f

Google/Blogger/Blogspot can lose your comment but if you have copied it, you can paste it back in! Always do this, but especially if you have spent significant time writing your comment. This is your number one way of giving a huge middle finger to Google! You can lose my comments Google, but you cannot take my SANITY! :) or, my ability to hit right click, copy.

blogger1g

This is a good habit to get into wherever you are commenting, because sometimes things go wrong and your comment may vanish. With that said, Blogger loses my comments way more often than any other blogging platform.

Do you have a blogger blog, but you do not have a notify me box? Check out this post – How To – Add Tickbox For Blogger Comment Emails.

Over to you –

Do your comments get lost very often? What steps do you take to prevent this? :) Do you have any hints or tips for fellow blog commentators? Leave them in the comments! ;)

Annoyed Snoskred, Blogger, how to guides

How To – Create Free Link Ups Via SimplyLinked

flower

I often see bloggers inviting other bloggers to participate in a blog award, or a weekly challenge, or even just asking other bloggers to provide links to blogs that they enjoy reading.

These days probably 75% of the time, it seems that bloggers are not using any of the link up tools that are available out there on the interwebs. I often think the major reason for not using these tools is because people tend to think these tools are a lot more complicated than they actually are, that setting up an account is time consuming, that it is all Too Hard.. but as this how to guide will show you, that is not the case at all.

If I told you that within the space of 10 minutes, you could create your account *and* your first link up, would you give it a try? If I am honest, it is more likely to take around 5 minutes, given it took me 6 minutes and I was taking screenshots and editing them in between.

How To – Create Free Link Ups Via SimplyLinked

Now I’m going to show you how to use one of the completely free, easiest and simplest link up tools which can save you a lot of time and energy PLUS make it easier for people to link up to whatever it is you have going on at your blog. The tool is called Simply Linked.

link1

First up, we have to create your account. Click on Sign up for a free account.

link2

You only need to provide 6 details as seen above – your name, email address, name of your website, website url, username and password. When you’ve filled in the boxes, hit submit.

link3

And you have created your account. Easy, no? So click on the link to go back to the home page and log in.

link4

Type in the username and password you just created, and hit submit. You’ll then find yourself logged in.

link7

There is not a lot to see here, because you have not created any link ups. So let us create one. Click on Create New List.

link5

Put in your link up name, and choose standard as the option. Click on create list.

link9

You will then have created your link up and you will be provided with some javascript code to paste into your blog. Simply copy it, and then paste it into your blog post. The finished product should look a lot like this – though my blog theme seems to have taken over making the button look quite spiffy here on my blog –

link6

It really is that simple. In fact, even with me taking screenshots, I had created my account and my first link up within 6 minutes. To create a new link up while logged in is only as long as it takes you to type in the title.

link8

Once you have created a link up, you can view it via the current lists screen, just click on current lists. To view the links which have been added, click on the link up name.

link10

Once people start adding links, you can choose to edit or delete them.

linkup1

Added links will appear at the top, above the place where people can add their links.

The best thing about this tool is – everything remains within your blog. Nobody is being sent elsewhere – they add their link within the post you’ve written. Here is a test link up, so you can give it a try right here if you like, I also want to see how it goes through on my feed..

This link up tool does not give you the option to use thumbnail images at all. There are link tools available which will allow people to add thumbnail images but *all* of those tools cost money. The tool I use here – Inlinkz – is a little more complicated to create a basic link up, and Inlinkz costs me $20 a year to allow thumbnails and have some extra options, eg I can allow my link ups to remain open forever.

Simply Linked is a good, basic, free option. You do have to keep an eye on your links to make sure nobody adds any spam – this is one reason why I would suggest that you close off link ups after a certain amount of time has passed. I am assuming they will add other options which people will have to pay for, eventually. Simply Linked is an excellent option for people wanting fast and easy to create link ups.

I will show you around – and how to use – Inlinkz in a future how to guide. I probably should also mention, in case anyone was wondering.. none of these companies are paying me to write about their link up tools, by the way. :)

Will You Use This Tool?

Over to you – let me know, do you think this is a tool you could use on your blog?

blogging tips, how to guides

How to – Schedule Posts In Blogger & WordPress

It has been a while since I did a how to schedule posts in WordPress post, so long in fact, that the old post is pretty much useless now. WordPress looks nothing like it did back then. I thought it is high time for an updated post on this topic, but I thought I would make sure to include Blogger as well. :)

If you use Typepad, this post is for you – How To Change Post Date & Time.

Why Schedule?

There are a lot of reasons why bloggers might want to schedule posts ahead of time. Going on holidays is probably the number one reason people would use this feature.

I work on a Mon-Wed-Fri posting schedule here on the blog. The main reason I schedule posts is because when I am inspired to write, I am REALLY inspired to write, and I might write 5-10 posts in the space of an afternoon. Obviously I do not want to *post* 5-10 posts all at once. It would be overwhelming to my readers, and it would mean I have no posts available the next time I am not inspired to write.

Timing Is Important

It also means you can set your posts to publish at the time of day people will be around to see them. For example here on my blog, I presently post things at 7am AEST. I am fast asleep in bed at that time, guaranteed. But posting my posts early here in Australia means I also catch the evening web surfers in the USA and the late night web surfers in the UK.

sched1

If I bumped it up to 5am, I might get the evening web surfers in the UK and super early morning surfers in Australia.. hmm, that is worth considering.

What Time Is Best?

You might get more eyes on your blog post if you change the time of day that you post it. It could be worth doing some experiments to see what times of day work best for your blog.

If you use a site counter or site stats program many of them will tell you what time of day people are visiting, of course taking into consideration they do not always show you every visit to your blog and can be unreliable. You can also consider what time people leave comments.

You could do a blog post and ask your regular readers to comment about what time of day they read your blog and whether they would prefer a different timing. Consider where your commentators live in the world and what time it is there when you post. Seasonal timing matters too – when we switch to daylight savings here, I will likely post at 6am AEST.

If you want to check what time it is in other places when you post, you can use the world clock meeting planner here.

Are you ready?

For the how to guides? :) It is quite a few screenshots, so I am using the read more feature today. Click through to see the how to guide! Continue reading

Blogger, how to guides, wordpress

How To – Get Started With Inoreader

ino1

Mid-May, an ex-work colleague of mine sent me an email. She and I had talked once about blogs and I’d mentioned my feed reader and explained how it worked. She had no idea where to start looking for a feed reader and searching for one had just confused her more, could I recommend a good feed reader?

I was writing my reply to suggest Inoreader but I wanted to include a link to a quick how to get started guide. A lot of the get started guides talked about how to import feeds from another feed reader, which my friend would not need to do.

I figured it would be easier to create something simple which would not confuse her, so I sent screenshots and instructions. Then I thought, why not put a how to guide here on the blog as well? So without further ado..

How to – Get Started With Inoreader

If you do not have a feed reader yet, and you are looking for one.. Inoreader is brilliant and super quick. You can get started just by entering an email address and a password. So open this link – Inoreader – in a new window, click on “Create a free account” and then follow this quick tutorial below to get feed reading.

ino2

Yes, all you will need is an email account and a password.

inogooglefacebook

You can also connect with Facebook or Google. If you choose those options you will have to allow Inoreader to get your email address and basic profile info. Me personally, I prefer the email address and password option, but this is your account, so whatevs. :)

inoskip

So once you have created your account you will arrive at the above screen. My advice – skip this first step. Chances are you know what blogs you want to subscribe to.

inotour

You will then be offered a free tour. My advice – DO NOT skip this step. :) Take the tour. I’ll be right here waiting when you’re done.

inoscreen1

Ok, so the tour is over, and now you see the main Inoreader screen. Of course, you’ll want to add me right away! Just type in my name..

inosnoskred

and there you see me. Select me, and then this screen will pop up.

snoskred

Click on subscribe.

inosub1

And there you have it – you subscribed to your first blog. Now, add in others that you want to read. You can try typing in the name, though be aware sometimes that might be a hard way to find a blog if the name is not unique.

inorewatch

What if you type in the blog name and nothing comes up? Then you can try entering the blog URL. Lets put in my rewatch breaking bad blog URL. Once you enter it, Inoreader will go off and try to find a feed, once the feed is found you can click on it and it will automatically subscribe to that feed.

inoemail

By now you have probably received an email welcoming you to Inoreader and asking you to confirm your email. Simply click on the link to confirm your email address.

So that gives you a quick overview of Inoreader and how to get started on setting it up. There is a really great support forum where questions are usually answered very quickly and the Inoreader blog has a lot of how to guides.

Best of all, there are mobile apps for iPhones and Android so you can read your subscriptions on the go. If you get stuck waiting out and about, you can catch up on your blog reading and it syncs up so you don’t read things more than once as a surprise to yourself.. :)

What Does Snoskred Use?

Me personally here at home, we have TinyRSS set up on our server because after Google Reader screwed their users over, I wasn’t going to use a third party feed reader again. I wanted complete control.

However for NaBloPoMo 2014, I tried out Inoreader and I found it to be excellent. They have a great support forum and when I asked a question there it was answered very quickly. Plus, you can create bundles to easily share your feeds with other people.

What Blogs Does Snoskred Read?

I have a process which I follow – when I find a new blog, I add it to the feed reader. On the last day of each month, I post a New Feeds post, which links to all the new blogs I am reading.

I test drive the new blogs for 6 months. At the end of 6 months I review each blog. If I have enjoyed reading the blog, I add it to the main blogroll.

What Makes Snoskred Unsubscribe?

The number one reason that I unsubscribe from new blogs is due to the blog providing a partial feed. I have written a couple of posts on other reasons I tend to unsubscribe – 10 New Reasons I Unsubscribed From Blogs14 Reasons Readers Unsubscribe From Blogs. I am not suggesting these reasons are always deal breakers for me

Do you feed read?

Over to you, tell me what you are using to read blogs. :) Would you like more how to guides for Inoreader?

If you have a blog, please leave me a comment wth link to your place, I’d love to check it out.. :)

feed readers, how to guides, Inoreader

How To – Add A WordPress.com Follow Button To Self Hosted WordPress.

steps

Why yes, that is a super long title but I have posted it in the hope that it will end up on the very first page of multiple search engines because I searched for a how-to do this for several hours the other day with zero luck..

Giving up on searching via Dogpile, Google, etc, I then searched wordpress.org support and also the support forum for the Jetpack plugin. I could find plenty of people asking how to do this, and zero answers. I ended up having to lodge a support ticket and I got an answer back which helped me work it out.

A lot of people when they receive the answer seem to keep it to themselves – not updating their support threads with the answer – which is probably why I could not find it, no matter how hard I searched. So here is the answer for anyone looking for it!

Important note – for this to work, you need to have the Jetpack plugin enabled on your self hosted wordpress blog.

step1

1. Go to Jetpack –> Settings.

step2

2. Activate JSON API within Jetpack – also take note, you will need to leave this activated for the button to continue to work.

step3

3. Visit the Follow Button Creation page.

step4

4. Scroll down to the area where you can enter in your blog URL. Enter it, then decide if you want to show how many followers you have, and whether you want to show your blog name. If you have a long blog name like mine, the button will be super long! Then, hit generate.

step5

5. Copy the code which has been generated.

step6

6. Go into your add widget area within appearance.

final

7. Paste the code into a text widget on your self-hosted wordpress blog. Hit save, and you are done!

Happy moments! :) And Whew, thank the deities that is over.

But I’m on wordpress.com?

Well then, this is super easy. :)

wp1

1. In Appearance –> Widgets – scroll down the page until you see Follow Button.

wp2

2. Drag and drop the follow button over to your sidebar.

wp3

3. Click on the little drop down arrow to see the options, adjust your options to suit and then click on save.

Done!

blogging tips, how to guides, wordpress, Wordpress Training Wheels

How To – Add Tickbox For Blogger Comment Emails

beach19

In setting your blogger blog to be full feed, you might accidentally cancel out the opportunity for your comments area to contain the all important “Notify Me” tick box – this tick box allows your commentators to choose to receive follow up emails when other commentators leave a comment.

bloggerfeed

Go to Settings –> Other –> Site Feed –> From the drop down box, select custom.

bloggerfeed2

Then, leave site feed as full, but turn off blog comment feed and per post comment feeds by selecting none as the option.

bloggerfeed4

Click on Save Settings in the top right hand corner.

bloggerfeed1

When you go back to your comments form, you should now see the tick box in the bottom right hand corner which says “Notify Me”.

bloggerfeed3

When your commentators are logged into Gmail and they click on notify me, it will advise them which email address replies will be sent to, as you see above.

It might be worth letting your commentators know that you have enabled this feature via a quick post.. :)

And there you have it!

Over to you!

Do you like to receive follow up emails for blog comments?

blogging tips, how to guides

How To Add Contact Page on WordPress

contacta

If you own a WordPress blog, setting up a contact page is super easy. And yet there are a lot of WordPress blogs out there without a contact form.

Why do I want a contact page?

People might want to contact you for all kinds of reasons. I get emails from blog readers fairly regularly and 99% of them are *not* spam. Sometimes they are very interesting emails indeed. I do get a lot of emails about older posts where the comments are turned off – comments on this blog switch off after 90 days.

Can’t I just use an email address?

Of course you can! However, it is my advice to you not to put your email address out there in the usual format – eg mailme@email.com – you will get spammed hugely. Best to put it in this kind of format – mailme {at} email {dot} com – you can see my email address over in the sidebar and I have both a contact form and the address on my contact page..

Can I do this on Blogger?

Sure, but their built in version is a sidebar widget. Here are some instructions which might help – New Blogger widget contact form.

Here is The WordPress How To –

Click on add new page in your WordPress dashboard.

contact1

This will take you to the add a new page form. It looks identical to add a new post. So add in your title – Contact is the obvious one, but you could use Contact Me or Contact Us, if there are more than one of you.

contact2

You will see under the title area, a box titled Add Contact Form. Click on that.

contact3

You will see this pop up preview box appear. Everything is there ready to go, and you could simply click on add this form to my post at the bottom, and it will all magically happen. In fact – lets do that, and see what happens next.

contact4

This is how the contact form appears in the text box in your post –

contact5

it does not look like much here, but once you hit publish page and then visit the page, it will look something like this –

contact6

The form will be affected by your CSS in your theme, so it might look slightly different to the version you saw in the preview box.

So there you have it – a contact form.

What if I get some spam?

If you get some spam you might decide to add a check box to the post – regular humans will know to tick the box, but spam-bots cannot follow the instructions and cannot tick the box. How do we add one? See the section on the form creator which says Can I add more fields?

contact11

Click on that, and you’ll be given a drop down box.

contact7

Choose check box from the list, and add in text – you could put Tick box if you are human, tick this box to send your message, even just tick this box – but make sure you tick required before you hit save this field.. Changes are made live so you will see how your new field will look on the form.

contact8

contact9

Over To You –

Have you ever wanted to contact a blogger privately but been unable to?

how to guides, wordpress

All About FTP.

When we organise webspace for someone, we offer them the option of FTP access. Many people who I’ve offered it to did not know what it was or how to use it. So I asked Sephy to take a moment and write one of his great how to information posts. Sephy has a knack of taking something scary and changing it to something you can understand, so if you are one of the people we are hosting a site for you will want to read his post.

How-to: Upload files using FTP

Resizing Images

Image Resizing Made Simple – in case you missed Sephy’s explanation of how to easily resize images.

how to guides, Wordpress Training Wheels

Assorted Blog Tip Goodness For Bloggers

Google, heatmaps, comments and spiders, oh my! There’s so much to know when you’re a blogger, so I keep putting together some of the little tips I am picking up to share with you. Blogger users take note, I have a couple of great ones for you here.

Have You Googled Your Blog Lately?

In order to get specific results for your blog put the following into the search box – site:www.snoskred.org – just replace the www.snoskred.org with your site URL.

If you want to search your own site only, you can also use Advanced Search and put your site in where it says Domain – Only return results from the site or domain. I use this all the time when looking for past things I wrote here.

For those of us getting frustrated with Technorati, it may be time to consider a Google search widget instead. I’m going to be checking further into this later today and may put a how to together for ya’all for future blogging tip goodness posts..

Find Out What Your Readers Click On

I read Create a Heatmap of Where Readers Click on Your Blog at Problogger and thought it might be something interesting to try. I put it on less than 24 hours ago and it is already showing me interesting information.

If you want to know more about your blog readers, this is an absolute must do. It is also really simple to do – and completely free!

Don’t Forget

I added a new section to my sidebar called Bloggers Are Helpful. It contains some of the best articles I have found about blogging. It is also constantly updated and in the weekly wrap up I will let you know what new articles have been added to it over the week.

If you have a helpful article which should appear in Bloggers Are Helpful, please email me or leave a comment linking to your article.

Blogger Issues.

Comments Policy.

Did you know you can add your comments policy to Blogger? It will show up just above the box where people enter their comments. Here’s a quick screenshot guide on how to do it.

From your Blogger Dashboard – click on settings.

settings

Click on Comments.

comments

Find the box that looks like this.

comments2

Type your comments policy into the box – and don’t forget to click save when you’re done!

save

Now when your blog readers want to comment, they will see what you typed into the box directly above the comments box. It will look like this –

page

Or perhaps like this if you have your comments appear in a pop up box.

popup

With Blogger you have a choice between a pop up comments box and a comments page – I prefer the comments page myself, which do you prefer as a commenter? and if you want your comments to be do follow I believe you can’t use the popup box. I’m not 100% sure on that one – anyone?

Where’s That Spider?

You may have read this post by Sephy where he talks about Blogger messing with the search engines. If you did not and you are using blogger, you need to know that Blogger has added a robots.txt file to your blog – without asking you, and without giving you any options of changing it.

What is a robots.txt? It simply tells the search spiders what to look at and what to ignore.

Blogger users are not able to submit a sitemap to Google – something ALL other bloggers can do, because it has to be on your site itself in .xml format and blogger does not allow you to upload .xml files to your blog. Blogger is telling the search spiders to read my feed as my sitemap. That means my feed read becomes my site map. Not an ideal situation at all. :(

Bloggers on WordPress and some of the other blogging platforms have a huge advantage over us – they can tell Google what pages to look at, what pages to ignore, and also get their labels listed.

Get Smart

Therefore we Blogger users will need to become smarter about how we do things. That is what the Snoskred Is section is about.

I only had 297 of my 500 posts on google for some strange reason. Some of my much older posts which I used to get hits for on certain search terms seemed to stop getting those hits.

What I chose to do was take the time to go back through my posts and make a links list with keywords appropriate to the post. I put it in my sidebar. It is long and nobody may ever actually look at it other than the spiders. However I do hope that my readers find it useful as well, if they want to know more about me it’s pretty much all there.

You may want to consider doing something similar yourself. It’s your blog. :) At the very least my thought is that you should have your favourite 10 posts available in your sidebar for your readers to check out and get to know more about you.

Consider WordPress.

I am working on learning a bit about WordPress. I have it installed on another domain I own, and Sephy and I are just messing about with it, learning how it works.

I had been getting mixed messages on WordPress. Some people told me WordPress was difficult to use and for more technical type people. Some people told me it was the best thing since sliced bread. Having now messed about with it I can say both are true. It does require some technical knowledge, but it is also is the best thing since sliced bread.

Blogger is great for most bloggers, I completely agree with that. It is easy, simple to use and you can now get templates for Blogger that look fantastic.

For those of us who want a little more control – who want to be in charge – who don’t want Blogger making decisions on their behalf without asking them – WordPress may be the better option. Will I be moving this blog to WordPress? Probably not at the moment, but maybe in the future. I am going to use WordPress for the business blog, though.

blog template, blogging tips, commenting on blogs, how to guides, wordpress